Tutorial Linux Mint How to Automatic Clone Backup System and Restore
|
8 years ago 0 |
Tutorial Linux Mint How to Automatic Clone Backup System and Restore
Clone system backup is the perfect way to store and restore your operating system without to loose data and applications that it took you so long time and effort to achieve. Additionally very fast you can restore your operating system and bring back exactly how it was .You can store your operating system on another partition, hard drive or preferably to external medium. The best way is to store in an img.gz format to avoid luck of space and size.
For example my operating system installed on 20 gigabyte size partition, it can be stored as an image.gz format to a file taking 8 gigabyte size in about 24 minutes. To restore it takes about 15 minutes in my laptop with dual core processor. Time is always according the pc and the store medium speed abilities.
The ideal way to clone system backup is to be automatic, perfect way if you do not have time or forget this important work of your operating system. The backup will be automated with gnome-schedule, using the commands dd and gzip.
The gnome-schedule is a great tool with many programming options. In this guide you will see the more advanced root operation.
Step 1
First to check if the cron job operates and it is active from Terminal.
service cron status
If this indicator comes is active.
cron start / running, process 1401
If not then you start the application.
sudo service cron start
Re-Enter the superuser root password to reconnect root with cron again.
sudo passwd root
Step 2
Install the gnome-schedule.
sudo apt-get install gnome-schedule
After from the Terminal.
sudo gnome-schedule
Step 3
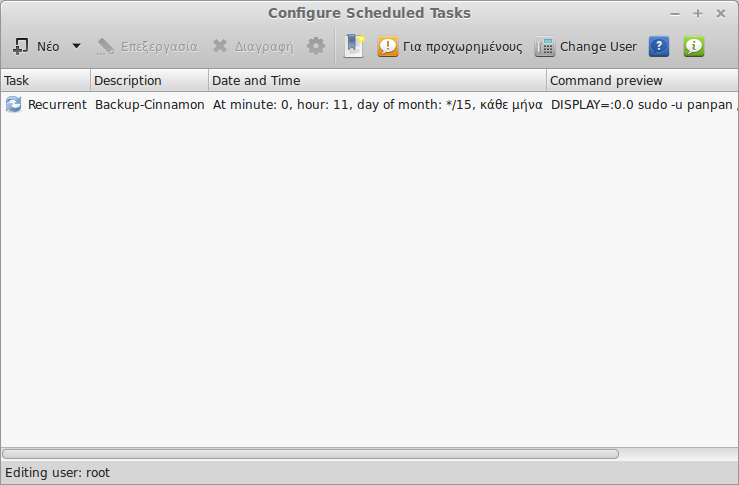
Once you start the gnome-schedule, will go on the left will select New> A task that launches recurrently or Recurrent task.
Step 4
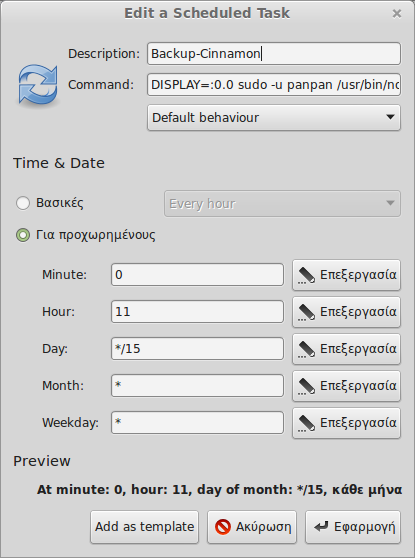
Here will be all the customization of programming.
Description: Give a name to work.
Default behaviour: Leave as it is.
Command: The most important part which will you carefully arrange.
The following command you will customize according to your settings, and it would be good to save and modify in LibreOffice Culc.
sudo service network-manager stop && DISPLAY=:0.0 sudo -u panpan /usr/bin/notify-send "Launched system backup" && dd if=/dev/sda9 bs=4096 conv=notrunc,noerror | gzip> /media/LAPTOPSTORE/Lenovo5030/linuxmint.img.gz && DISPLAY=:0.0 sudo -u panpan /usr/bin/notify-send "Completed system backup" && sudo service network-manager restart
As you notice the code has sudo service network-manager stop and sudo service network-manager restart. If you want to have a good backup you must not interact with you system direct or indirect, which means not any activity by you or the Internet.
1) Change to your own user name panpan is mine.
2) Instead sda9 which is my own partition of my operating system, the corresponding yours. You can find yours by sudo blkid or opening the gparted.
3) Made the destination backup folder on a different sector (partition) of the hard drive or an external storage. After making that folder right click that folder copy and paste to replace part of my own example [/ media /LAPTOPSTORE/Lenovo5030], with the corresponding yours.
After you add the name of the image that you want to give [xxxxxxx.img.gz]. So your command will look like this.
sudo service network-manager stop && DISPLAY=:0.0 sudo -u username /usr/bin/notify-send "Launched the Cloning system" && dd if=/dev/sda9 bs=4096 conv=notrunc,noerror | gzip> /media/xxxxxx/xxxxxxx/xxxxxxx.img.gz && DISPLAY =:0.0 sudo -u username /usr/bin/notify-send "Completed Cloning System" && sudo service network-manager restart
If it is ready your command now copy and paste into the Command:
Step 5
The following settings you can modify to suit your needs, I show what settings I choose.
Select the Field Advanced>
1) Month> Edit> Every month> OK. Every month to run the task.
2) Day> Edit> In a step width - Days 15> OK. To perform the task every 15 days of the month. A good setting for something that went wrong recently. You can make and month sooner rather the risk goes up.
3) Hour> Edit> At an exact hour- Hour 11> OK. To run on 11 or your own time selection.
4) Minute 0
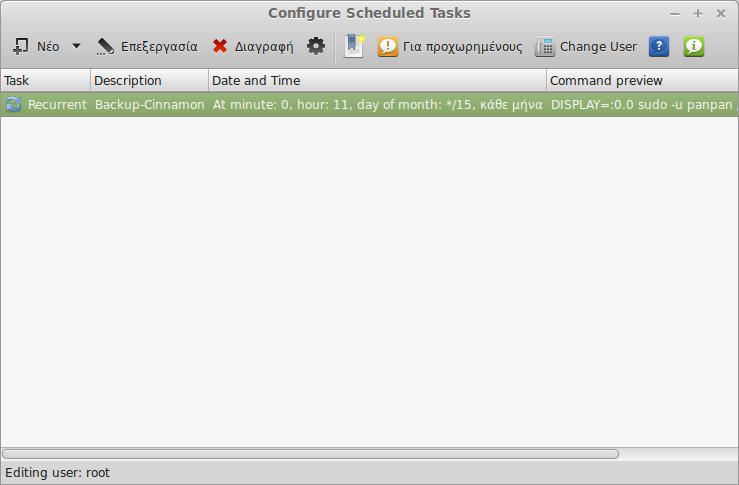
When you complete the settings you select Add> OK and ready your backup order for automatic image storage.
Pay attention do not select the Edit option (in a range, it will do the job every, minute, hour and so on.
Step 6
Now some things to keep in mind. The backup will be automatically and if you do not change the name linuxmint.img.gz, then it remains the same file, only you will know that it is the latest version of image backup every time that does the backup. If you have space at your store and want to save more images, then you change the file name at the example command to linuxmint2.img.gz, after the first storage and in the same way you can store more images.
When starts the backup comes the message "Launched system backup" according to the administrative alerts available on your distribution and "Completed system backup" when completed.
Step 7
To restore the backup image will copy the saved image with your right mouse button and paste to replace [/ media/LAPTOPSTORE/Lenovo5030/linuxmint.img.gz] in LibreOffice Culc. Your command will be then ready with the right form of the stored image. Change also the /dev/sdax where the ax of your operating system.
If you have correctly made the restore command, in LibreOffice Culc, next time you use the same by copying and pasting.
Always restore takes place outside the operating system from Live CD, USB or other functional Linux operating system.
From the Terminal first the command.
sudo su
and then.
gzip -dc /media/xxxxxxxx/xxxxxxxx/linuxmint.img.gz | dd of =/dev/sdax bs=4096 conv=notrunc,noerror
During the operation open another terminal give the following command to see the procedure of the work from the first terminal.
watch -n5 'sudo kill -USR1 $ (pgrep ^ dd)'
If you do not want to waste the alerts that come from your operating system (Cinnamon has this function) then install the latest recent-notifications alerts.
sudo add-apt-repository ppa: jconti/ recent-notifications
sudo apt-get update
sudo apt-get install indicator-notifications
After logout or reboot. So you do not miss any notification where usually you can find at bottom right.
Enjoy this important automatic operation of your operating system.
Comments
I'm sorry i'm a n00b, but i can't understand the step 6.
Is it a problem if i let the name linuxmint.img.gz by default ?
@MagicMint points out some important things.
Here are some more thoughts.
Why not let MintBackup do the actual backing up? That way you also get information about installed programs. A recovery into a fresh installed machine is easy.
Backing up to external media is all but required to keep data safe in case of disaster or theft. Furthermore backup should be done to different media or path every time to avoid a botched backup destroying your only backup. (That will happen just prior to the disk crashing according to Murphy)
Using dd require equal size and geometry of the disks so a new disk has to be more or less identical to the original or it may not work.
.
Be aware that path names usually don’t have blanks inserted before or after a slash! The way they’re listed in your commands prevents the latter from working :-(
Moreover, if gnome-schedule seems to be a good interface for cron jobs, such a scheduled job is easily missed if the computer isn’t on at the scheduled time. For asynchronous backups, a script in /etc/cron{.hourly,.daily,.weekly,.monthly} would be a more suitable choice.
Last but not least, it would be preferable to direct the backup on some external drive, since there is no point in saving the contents of a partition on another partition of the same drive ;-)