VISUAL GUIDE: Oum el Ghaït, GIMP and Linux Folders
|
10 years ago 5 |
. Oum el Ghaït.png?dl=0)
. Oum el Ghaït.png?dl=0)
Introduction
My taste in music is fairly ecclectic. If I have one weakness, it's for solo female singers with beautiful voices. Oum el Ghaït Benessahraoui from Moroccoo (or Oum for short) is one of my all time favourites. I can't understand a word of Arabic, but what a voice. Click on either of the two folders above to listen to a couple of my favourite tracks.
This tutorial isn't about music. It isn't really about getting an image onto a standard Linux Mint folder icon either.
This VISUAL GUIDE tutorial is about using GIMP and is aimed of squarely at BEGINNER LEVEL Linux Mint users (GIMP newbee's looking to get their feet wet).
If you work your way through this tutorial and manage to get an image of your favorite singer onto a standard Mint-X - Linux Mint folder, you will have been introduced to the following GIMP topics:
- Selecting most appropriate aspect ratio to use for a particular image.
- Cropping images.
- Using a fixed aspect ratio to crop an image.
- Scaling images (e.g. making icons bigger so they are easy to work on)
- Scaling images (e.g. making icons smaller - returning them to their original size once you have finished working on them)
- Opening an image as a layer
- Converting .svg files to .png files / Converting .jpg files to .png files.
- Opening the Toolbox and using the Move tool to move a layer.
- Merging visible layers.
I don't claim to be a GIMP expert. I probably only use about 2% of GIMP's capabilities; however this 2% lets me accomplishes most of my graphical file manipulation requirements.
---------------------------------------------------------------------------------------------------------------------------------------------------------------
Instructions
a). Obtain a copy of the Linux Mint folder icon.
i). Linux Mint stores it system icons in /usr/share/icons/Mint-X
. Storage location folder.svg.png?dl=0)
ii). Navigate to the following Absolute Address:
- /usr/share/icons/Mint-X/places/128
iii). Locate and copy the folder.svg icon.
iv). Paste folder.svg onto your desktop.
. Folder.svg image.png?dl=0)
Note:
The Mint-X folder is locked down so you can't accidentally alter or delete critical system icons.
You can however copy icons from the Mint-X folder.
---------------------------------------------------------------------------------------------------------------------------------------------------------------
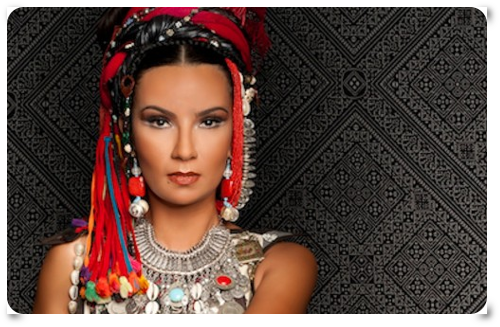
b). Download a photos of Oum el Ghaït from the web
Surf the web and download a suitable photos image of Oum el Ghaït Benessahraoui (preferably landscape mode). I decided to utilise the following image.
. Oum_Soul-of-Morocco1©Lamia-Lahbabi-658x350.jpg?dl=0)
Oum el Ghaït - 658x350.jpg
---------------------------------------------------------------------------------------------------------------------------------------------------------------
c). Convert both images to .png file extension
i). Right Click on folder.svg image file and:
-
Open With --- GIMP Image Editor
ii). Export the folder.svg file to your desktop as folder.png.
-
File --- Export As... --- Click on Export button
iii). Right Click on Oum el Ghaït - 658x350.jpg image file and:
- Open With --- GIMP Image Editor
iv). Export this image file to your desktop as as Oum el Ghaït.png
. Oum_el_Ghaït.png?dl=0)
microHOWTO
Click on the relevant icon below to download a copy in the format you desire.
- MicroHOWTO: Converting image file types in GIMP (from .jpg to .png)

---------------------------------------------------------------------------------------------------------------------------------------------------------------
d). Increase the size of your folder.png image to 500 x 500 pixel
i). If you open up your folder.png image with GIMP, you will see that the image size is 128 x 128 pixel (128 pixel wide by 128 pixel high).
![]()
ii). This is a very fiddly size to work with, so increase the image size to 500 x 500 pixel.
- Image --- Scale Image
![]()
iii). That's better.
Note: The light and dark grey check pattern around the folder is actually part of the image (outside of GIMP it will appear transparent).
iv). The Oum el Ghaït.png image is already 658x350 pixel, which is plenty big enough to work with.
If the image you select to work with is too small, you should scale it up so that the width is +/- 500 pixel.
---------------------------------------------------------------------------------------------------------------------------------------------------------------
e). Determine the aspect ratio of the green portion of the folder.png image
i). As you can see from the image below the aspect ratio of the green section of the folder.png image is 156:100
- Windows --- Dockable Dialogs --- Tool Options
- Tools --- Transform Tools --- Crop
- Width of selection = 475 pixel
- Height of selection = 304 pixel
- Use your screen calculator to divide 475 by 304.
- 475 / 304 = 1.56
- That's equivalent to an Aspect Ratio: 156:100
. Aspect Ratio of 156 to 100.png?dl=0)
---------------------------------------------------------------------------------------------------------------------------------------------------------------
f). Crop your "Oum el Ghaït.png" image using a fixed aspect ratio of 156:100
i). What we are trying to achieve is to end up with an image which is marginally larger than the green section of your 500x500 pixel folder.png image.
- The idea being that this image will perfectly cover the green section of the folder.png image with your Oum el Ghaït.png image.
ii). Aim to make your image +/- 2% bigger than the green area you are trying to cover, to give yourself some wiggle room when you are dragging your image file into position.
iii). Information from Screenshot below:
- Width of selection = 495 pixel (for the image I cropped with a fixed aspect ratio of 156:100).
. Crop with fixed aspect ratio.png?dl=0)
iv). Information from screenshot below:
You can see that I only need a width of 478 pixel to cover the green section of my 500x500 pixel folder.png image (but remember my Oum el Ghaït.png image is 495 pixel wide; much too big).
No problem I can resize my 495 pixel wide cropped image to 478 pixel wide (and because the aspect ratio of this image is 156:100, I should end up with a height of 308 pixel).
- Image --- Scale Image...
![]()
---------------------------------------------------------------------------------------------------------------------------------------------------------------
g). Create an image with rounded corners
i). If you wanted you could round the edges of your Oum el Ghaït.png image, so that it more closely resembles the green section of the folder.png image that it will be covering.
ii). This subject is not covered in this tutorial. Click on the image or link below if you are interested in this subject.
Make an image with rounded corners for a website in GIMP 2.8
---------------------------------------------------------------------------------------------------------------------------------------------------------------
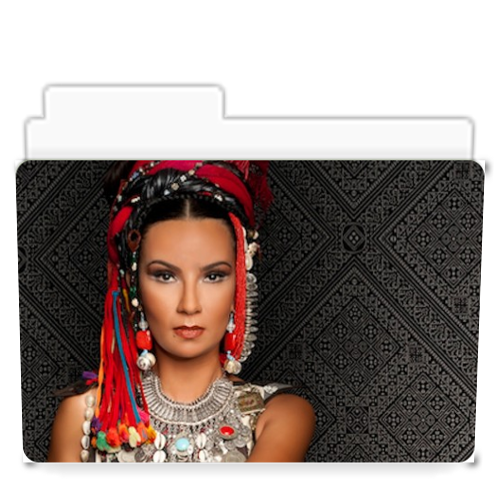
h). Open "Oum el Ghaït.png" image as layer on top of "Folder.png" image
i). Right click on Folder.png image and Open With --- GIMP Image Editor
ii). File - Open as layers...
iii). Locate Oum el Ghaït.png image and Right Click on Open button in Open Image pop-up window.
iv). The Oum el Ghaït.png image will open up on top of the folder.png image in GIMP. It will not be positioned correctly.
---------------------------------------------------------------------------------------------------------------------------------------------------------------
i). Move the move the Oum el Ghaït.png image into place.
i). Left Click on Tools --- New Toolbox to open up the Toolbox (complete with the Move Tool icon).
. Move Tool in Toolbox.png?dl=0)
ii) Left Click on the Move Tool icon.
iii). Click on the top image of Oum and move it into place, directly above the green section of the folder.png image.
. Move top image with Move Tool.png?dl=0)
iv). This is where you find out if all your earlier work with aspect ratio and image size has paid off. The image of Oum should cover the green section of the folder.png image (but only just).
---------------------------------------------------------------------------------------------------------------------------------------------------------------
j). Merge the two layers
i). Image - Merge visible layers...
. Merge two layers.png?dl=0)
ii). Click on the Merge button when the Merge Layers pop-up window opens up
. Click on the Merge button.png?dl=0)
---------------------------------------------------------------------------------------------------------------------------------------------------------------
k). Resize new folder image back to it's original size (128x128 pixel)
i). Image - Scale Image...
![]()
---------------------------------------------------------------------------------------------------------------------------------------------------------------
l). Export your finished folder to your Desktop
i). File --- Export As...
ii). Check that you can resize the folder.
iii). Check that the folder will store files and open up correctly
---------------------------------------------------------------------------------------------------------------------------------------------------------------
References
- Make an image with rounded corners for a website in GIMP 2.8 (by Dom Bower from Scotland)
Comments
@MagicMint:
you are right and I do appreciate his work on a serious way -
but as said before -
he said:
"...This tutorial isn't about music. It isn't really about getting an image onto a standard Linux Mint folder icon either..."
and so I said:
"...there is a much more easier way to get this done.."
But of course, I do adore his (efforts +) tutorial
! @chilipadi ! :
if you like sounds like this, here is smthg sweeet 4U:
https://www.youtube.com/watch?v=Wsb7_QJj-to
;-)
sorry I mistaked it with:
Nicolas-Yvan Mingot - Symphonuit;
outtake from the album "Magic Marrakech" by Claude Challe
https://www.youtube.com/watch?v=A6WYdShjVTM&list=PLBEAEA9D5830B4631
this is the one I meant; really a good piece, dam
@chilipadi: It’s ingenious to adapt the standard icons to your liking (even though I don’t often use them magnified ad that point).
“I can't understand a word of Arabic…”: What a luck, she sings the last half of “Soul of Morocco” in English. And so the visual harmony meets the musical one — gorgeous…
@MagicMint:
you are right and I do appreciate his work on a serious way -
but as said before -
he said:
"...This tutorial isn't about music. It isn't really about getting an image onto a standard Linux Mint folder icon either..."
and so I said:
"...there is a much more easier way to get this done.."
But of course, I do adore his (efforts +) tutorial
Chilipadi, your tutorial is awesome as usual
and so I do promote it
but sorry,
but there is a much more easier way to get this done -
your description given is making the story unneccessary complicated.
Hammer459 - Thanks for your comments.
Now that I have the framework done for this tutorial, I plan to continue adding VISUAL microHOWTO's to make it more accessible for BEGINNER LEVEL Linux Mint users.
This I will definitely make use of.
Thanks man