VISUAL GUIDE: Insert screenshots from Dropbox into Community.Linuxmint.com documents
|
10 years ago 6 |

The Dropbox image below was inserted into this COMMUNITY.LINUXMINT.COM document, from a file called Dropbox.png that I have stored on my Dropbox account. This document shows the various steps taken to achieve this outcome.
On a more practical note; all the other screenshots which appear in this document, were also pulled in from images stored on my Dropbox account.

Dropbox.png
Instructions
1). Make sure you have your COMMUNITY.LINUXMINT.COM document open in edit mode
2). Log into your Dropbox account.
3). A blue Share button will appear when you hover your cursor over the image file that you plan on inserting into your COMMUNITY.LINUXMINT.COM document.
Note:
I was NOT able to insert .jpg images into my tutorials. I believe this limitation is imposed by the CKEditor that is used on the COMMUNITY.LINUXMINT.COM website.
The simple workaround is to find another suitable .png image, or use GIMP to convert your .jpg image to a .png image.
4). Click on this Share button and a pop-up window will open. In this case it is called Share link to ‘Dropbox.png’
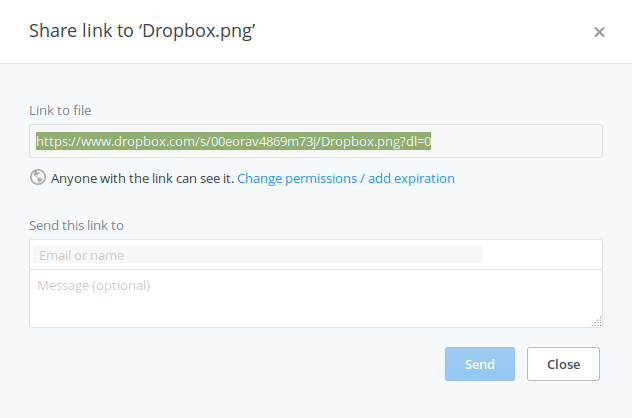
5). Highlight the URL in the Share link to 'Dropbox.png' pop-up window, Right Click and select Save from the drop down menu.
- https://www.dropbox.com/s/00eorav4869m73j/Dropbox.png?dl=0
6). You can close the Share link to 'Dropbox.png' pop-up window now by clicking on the Close button.
7). Notice that your Dropbox.png image now has the Link icon (in the Shared with column).

8). Move your cursor over the Link icon and it will tell you that People with the link can view

9). Open up your web browser (Firefox, Chrome etc) and paste the link you saved earlier into the URL data entry window (you will NOT be able to load the Dropbox.png image from your browser at this stage).
--------------------------------------------------------------------------------------------------------------------------------------------------------------
10). Critical Step:
Modify your URL by replacing www.dropbox.com with dl.dropboxusercontent.com
- Original URL: https://www.dropbox.com/s/00eorav4869m73j/Dropbox.png?dl=0
- Modified URL: https://dl.dropboxusercontent.com/s/00eorav4869m73j/Dropbox.png?dl=0
You can check to see if your Modified URL is working at this stage. The Dropbox.png image should load up in your web browser if you have done everything right so far.
Click on the link above to see what should appear in your browser.
--------------------------------------------------------------------------------------------------------------------------------------------------------------
11). Go back to your COMMUNITY.LINUXMINT.COM document.
12). Position your cursor where you want the Dropbox.png image to appear on your document.
13). Click on the Image Icon in the CKEditor Icon Selection Table at the top of your COMMUNITY.LINUXMINT.COM webpage (icon of house with red roof, on the left, four lines down, next to the Flash icon)

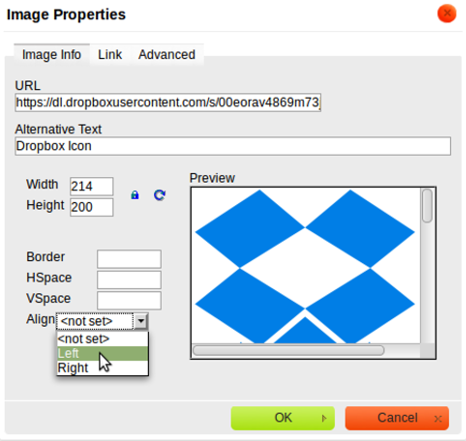
14). An Image Properties pop-up window will open up.
![]()
15). Position your cursor in the URL data entry box and paste in the modified URL from your browser (Firefox / Chrome etc).
- https://dl.dropboxusercontent.com/s/00eorav4869m73j/Dropbox.png?dl=0
16). Click on any of the other Data Entry Boxes (e.g the Alternative Text data entry box) and immediately the Dropbox Image will appear in the Preview Box.
17). You can type Dropbox Icon (or some similar description) into the Alternative Text data entry box, if you want (not required).
18). You will notice that the Align data entry box is not set. Click on the drop down arrow next to this data entry box and select Left if you want the Dropbox Image to be aligned on the left hand side of your document.
19). Now all you have to do is click on the green OK button at the bottom of the Image Properties pop-up window and you should end up with the Dropbox.png image appearing in your COMMUNITY.LINUXMINT.COM tutorial.

20). The image will probably be too large. You can Left Click on the Dropbox Image, go to one of the corners of the image and drag the image to whatever size you desire.
21). Once you have made any final adjustments, click on the green Save this tutorial button (bottom left) to save all your edits.

--------------------------------------------------------------------------------------------------------------------------------------------------------------
Download a copy of this tutorial
Click on the relevant icon below to download a copy in the format you desire.
- VISUAL GUIDE: Insert screenshots from Dropbox into Community.Linuxmint.com tutorials


--------------------------------------------------------------------------------------------------------------------------------------------------------------
1st Sep 2015 Update to this Tutorial:
Using Shutter (Revision 0.93) to upload screenshots to Dropbox may be a less labour intensive solution than following the steps listed in my tutorial above:
Shutter is my preferred program for taking screenshots. I find it much more convenient to use than the default Screenshot program, which comes pre-installed with Linux Mint.
Shutter (Rev. 0.92) is available on Linux Mint and can be easily installed using Software Manager.
Shutter (Rev 0.92) uses the deprecated Public folder functionality of Dropbox, which has not been supported by Dropbox for more than a year now. Shutter (Rev 0.92) will successfully upload files to your Dropbox account, but the uploaded files will have invalid URL links that will display a 404 when opened in a browser.
Marco van Hilst has rewritten the plugin used in Shutter (Rev 0.92) and the new plugin is available in Shutter (Rev 0.93) which was released on the 17th Aug 2014.
This new plugin should generate proper links to the files stored in Dropbox, without having to alter the URL links as described in my Community.Linuxmint.com tutorial above.
How to install Shutter (Rev.0.93):
I use the Linux Mint Debian Edition (LMDE) "Betsy" distribution and I currently have Shutter (Rev 0.92) installed on my computer.
I have not found an easy way yet to upgrade to Shutter (Rev. 0.93) on my Debian based distribution.
If you have a regular Ubuntu based Linux Mint distribution installed on your computer (e.g. Linux Mint 17.2 "Rafaele") it should be relatively easy to upgrade to Shutter (Rev. 0.93) by adding the Shutter PPA from the Ubuntu PPA Repository, following the instructions in the link below:
http://shutter-project.org/faq-help/ppa-installation-guide/
Think before you install external PPA's:
Unfortunately there are additional risks involved in using external PPA's. If you are new to Linux and are unfamiliar with the risks involved in using third-party PPA's, you might want to read the following articles before you proceed:
I see nothing wrong with making use of the Ubuntu PPA Repository however you must do your own due diligence and make your own mind up before you proceed.
You might also want to read drexlar's bug report below (3rd Mar 2015):
http://shutter-project.org/2014/12/new-bugfix-release-0-93-1/comment-page-1/#comment-1417028
--------------------------------------------------------------------------------------------------------------------------------------------------------------
References:
Comments
Leave a comment if you have any experience (good or bad) using Shutter (Rev. 0.93) to upload images to your Dropbox account.
Does Marco van Hilst new plugin in Shutter (Rev 0.93) generate proper URL links to the files stored in your Dropbox account?
Thanks for your comment Rebel450, however I must point out that I didn't come up with the idea of modifying the URL.
I got the idea from an article by Ryan M who lives in San Francisco and incidentally works for Dropbox.
Using Dropbox to host images on your Website by Ryan M of San Francisco / USA).
Great, I would never come to the idea to change the url,
for that it is compatible with the mint community given editor :-( arghf...
big+ , especially for your nice how2 and all your time and efforts
that's nice. Thank you
Hi
I Installed Shutter 0.93 on Ubuntu 14.04.1 from Shutter PPA. It installed with no problems. When executed the window appears and seems to be ok but after some seconds (20) the window becames gray. The window can be moved or minimized but no other operation can be done. In other words it is unusable.
Today I installed Shutter 0.93.1 which supposedely fixes some bugs of version 0.93. I was dissapointed. I obtained exactly the same behaviour that I got with version 0.93. I do not understand which bugs were fixed in version 0.93.1. It is still buggy.
drexlar