Linux Mint 17.X and 18.X (but also Ubuntu 14.X, 15.X, 16.X, 17.X) Full Disk Encryption (directory /boot included) Part 2 - PC with BIOS & HDD with GPT
|
5 years ago 3 |

Linux Mint with Full Disk Encryption, directory /boot included
Part 2 - PC with firmware BIOS & HDD with GPT partitioning scheme
Author: Naldi Stefano (linux22 at Mint Forum)
June 2015
Version 2.4
Last update: 3 May 2017
Other tutorials concerning Linux Mint with Full Disk Encryption, directory /boot included:
- LINUX MINT FDE FOR PC UEFI + HDD GPT, BOOTING WITH EFI STUB LOADER New !!!
- LINUX MINT FDE FOR PC BIOS + HDD MBR
- LINUX MINT FDE FOR PC UEFI + HDD GPT
- HOW TO ENABLE UEFI SECURE BOOT WITH YOUR OWN CUSTOM KEYS
- DUAL BOOT FOR WINDOWS 10 & LINUX MINT FOR PC UEFI + HDD GPT
Table of contents
GNU Free Documentation License
Disclaimer and acknowledgments
LINUX MINT FDE INSTALLATION FOR PC WITH BIOS AND HDD WITH GPT
Step 1 - Set up the target HDD, require Ubiquity
Step 3 - Set up of the Linux installation, require Ubiquity
Appendix A – How to enhance the encryption strength of your Linux Mint FDE (for paranoids, like me)
Appendix C – Emergency tools - How to reinstall GRUB after ...
GNU Free Documentation License
Version 1.3, 3 November 2008
Linux Mint with Full Disk Encryption, directory /boot included - PC with BIOS and HDD with GPT
Copyright (C) 2015 2016 2017 2018 Naldi Stefano.
Permission is granted to copy, distribute and/or modify this document under the terms of the GNU Free Documentation License, Version 1.3 or any later version published by the Free Software Foundation; with no Invariant Sections, no Front-Cover Texts, and no Back-Cover Texts.
You should have received a copy of the "GNU Free Documentation License" along with this document.
If not, see <http://www.gnu.org/licenses/>.
GNU GENERAL PUBLIC LICENSE
Version 3, 29 June 2007
Linux Mint with Full Disk Encryption, directory /boot included - PC with BIOS and HDD with GPT
Copyright (C) 2015 2016 2017 2018 Naldi Stefano
This program is free software: you can redistribute it and/or modify it under the terms of the GNU General Public License as published by the Free Software Foundation, either version 3 of the License, or (at your option) any later version.
This program is distributed in the hope that it will be useful, but WITHOUT ANY WARRANTY; without even the implied warranty of MERCHANTABILITY or FITNESS FOR A PARTICULAR PURPOSE. See the GNU General Public License for more details.
You should have received a copy of the "GNU General Public License" along with this program.
If not, see <http://www.gnu.org/licenses/>.
Linux Mint 17.X and 18,X Full Disk Encryption (directory /boot included) - PC with firmware BIOS
I wrote this guide/tutorial with the hope that it will be useful for everyone who need a Linux installation with Full Disk Encryption. The solution here reported is EXPERIMENTAL and need a good experience with Linux and its installation. At the moment I have successfully experimented this solution with Linux Mint 17.X and 18.X Cinnamon and Mate, Ubuntu 14.X, 15.X, 16.X and 17.X, all 64 bit version.
This guide/tutorial comes with ABSOLUTELY NO WARRANTY.
Prior of all I must thank Pavel Kogan (http://www.pavelkogan.com/2014/05/23/luks-full-disk-encryption/ and http://www.pavelkogan.com/2015/01/25/linux-mint-encryption/), because without his publications this solution would have never been possible.
Another thanks go to Rarylson Freitas (http://askubuntu.com/questions/468466/why-this-occurs-error-diskfilter-writes-are-not-supported), whose 00_header file patch has solved a fastidious warning during start-up.
Another thanks go to Callum Cameron, whose advices have showed me the correct installation of the system via Ubiquity (see the new structure of Step 1). That is an important achievement because now Ubiquity ends without errors, performing all the expected tasks. Callum has also build a script for the automatisation of the procedures described in this tutorial. If you want to try and test this script see the instructions at https://github.com/CallumCameron/mint-encrypted-install.
- https://help.ubuntu.com/community/EncryptedFilesystemsViaUbiquity
- http://thesimplecomputer.info/full-disk-encryption-with-ubuntu
- https://wiki.archlinux.org/index.php/Dm-crypt/Encrypting_an_entire_system
- https://wiki.archlinux.org/index.php/Dm-crypt/Device_encryption#Keyfiles
- https://wiki.archlinux.org/index.php/Dm-crypt/System_configuration
- https://wiki.archlinux.org/index.php/GRUB#Boot_partition
- https://wiki.archlinux.org/index.php/LVM
- https://wiki.gentoo.org/wiki/GRUB2
The solution is essentially simple but require a lot of terminal commands. If the user make a mistake and commit a wrong command he can cancel the target HDD or damage its software structure. So, if you commit the commands listed in this guide/tutorial using 'Copy' and 'Paste' pay attention to do not alter them.
INSTALLATION FOR PC WITH BIOS AND HDD WITH GPT - BEGINNING
The installation require:
PC with firmware BIOS (GPT-Aware) and HDD with GPT partitioning scheme.
HDD with at least 25 GB free space.
CD Live Mint 17.X, 18.X Cinnamon or Mate, or Ubuntu 14.X, 15.X, 16.X, 17.X
The installation here described assume:
Installation of Linux on: /dev/sda
Physical volume for encryption build on: /dev/sda1
Device for boot loader installation: /dev/sda
Reserved BIOS boot area: /dev/sda2
Physical Volume: /dev/mapper/sda1_crypt
Volume Group: mint
Logical Volume for swap: swap
Logical Volume for root: root
IF YOU CHANGE THESE ASSUMPTIONS THEN CHANGE THE UBIQUITY SETTINGS AND THE LISTED TERMINAL COMMANDS ACCORDINGLY !!!
MY ADVICE, BEFORE EXPERIMENTING THIS INSTALLATION ON A REAL PC, IS TO TRY AND INSTALL IT ON A VIRTUAL MACHINE LIKE VIRTUALBOX. WHEN THE USER SUCCEEDS WITH THE INSTALLATION AND BECOMES FAMILIAR WITH THE LISTED TERMINAL COMMANDS THEN HE CAN TRY A REAL INSTALLATION.
The procedure described in this guide/tutorial is divided in 4 steps and 1 appendix:
Step 1 – Set up the target HDD, require Ubiquity
Step 2 – Set up the LVM, Physical Volume, Volume Group and Logical Volumes for root and swap,
require a few Terminal commands
Step 3 – Set up of the Linux installation, require Ubiquity
Step 4 – Fixing, patching and updating of the Linux installation made with Ubiquity, require a lot of
Terminal commands
Appendix A - How to enhance the encryption strength of your Linux Mint FDE (for paranoids, like me).
Appendix B – Emergency tools - How to access your encrypted partition with your Mint or Ubuntu Live CD
Appendix C – Emergency tools - How to reinstall GRUB after ...
The Terminal commands listed in this guide/tutorial are typed in RED COLOR.
If you use 'Copy' and 'Paste' to insert these commands in your Terminal window, pay attention for those whose lenght takes two or more lines.
Prior to 'Paste' these long commands in Terminal check them inside an editor and if the command is broken in two or more lines reassemble it correctly over one single line. Then you can 'Paste' the command in your Terminal window.
Step 1
Boot your Live CD in the target PC and when ready open a Terminal windows, then start Ubiquity committing the following Terminal command:

sh -c 'ubiquity -b gtk_ui'&
In this way you can start Ubiquity skipping the installation of the boot loader and therefore finish the Ubiquity process without errors.

Click 'Continue'
If you are installing Linux Mint 18.X this new Ubiquity page will appear.
Here you can choose if installing third-party software or not.

Make your choice and go on.

Click 'Continue'

Now you are in the 'Installation type' page. Select 'Something else' and click 'Continue'

Now you are in the “Partition manager” page. Check that your HDD is showed. Select the free space on your HDD and click '+'. You can see that the ComboBox 'Device for the boot loader installation' is not available. Please assume the same concept also for the next pictures. I will update them as soon as possible.

When you select the size of this partition leave at least 16 MB of free space at the end of the disk, then from the dropdown menu select the 'Type for the new partition' as 'Primary', 'Location for the new partition' as 'Beginning of this space' and 'Use as' as 'physical volume for encryption'. The system will ask for the security key (password) of the physical volume. Insert it twice. If you want to erase the empty disk space check the radio button below, but remember that it take a long time. Then click 'OK'.
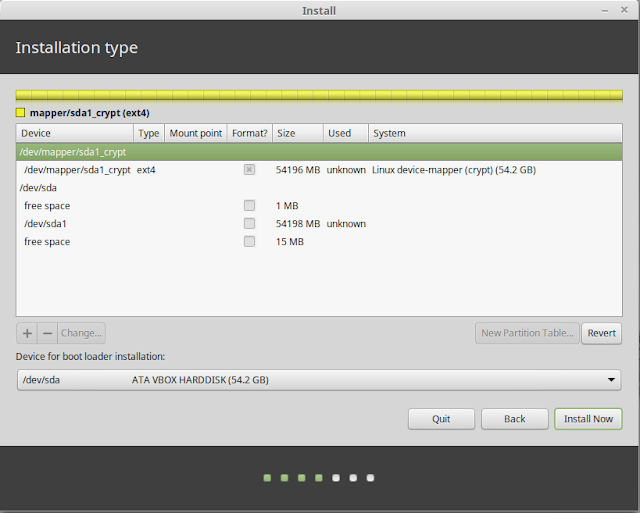
After a few seconds you will see a new device named '/dev/mapper/sda1_crypt' and 15-16 MB of free space at the end of the disk.
Leave Ubiquity window open and go on.
Step 2
Open a Terminal window and commit the following 4 commands:

sudo pvcreate /dev/mapper/sda1_crypt
sudo vgcreate mint /dev/mapper/sda1_crypt
sudo lvcreate -L 4G mint -n swap
sudo lvcreate -l +100%FREE mint -n root
The first command create the Physical Volume, the second command create the Volume Group, the third command create the Logical Volumes for swap, with a size of 4 GB (the size is arbitrary), the fourth command create the Logical Volumes for root, with the remaining space available in the Volume group.
Leave the Terminal window open and go back to Ubiquity window and there click 'Back'.
Step 3
You are again in the 'Installation type' page of Ubiquity. Select 'Something else' and click 'Continue'
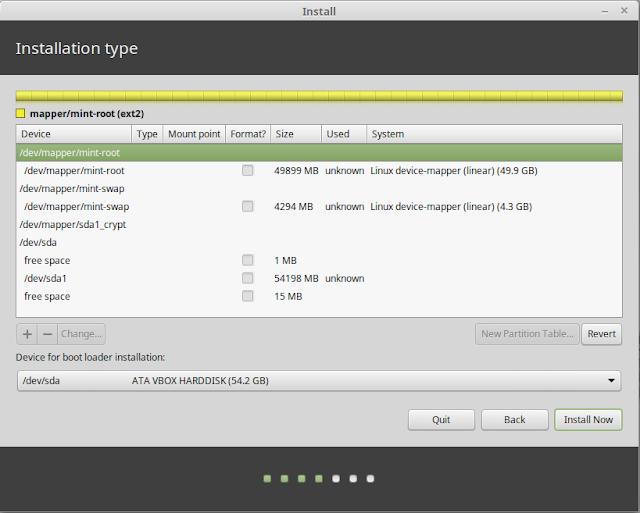
Now you are in the Partition manager page again. Check for the presence of the Logical Volumes named '/dev/mapper/mint-root' and '/dev/mapper/mint-swap' and 15-16 MB of free space at the end of the disk.

Select '/dev/mapper/mint-root', click 'Change' and select 'Use as' as 'Etx4 journaling file system' from the dropdown menu, then select 'Format the partition' and choose 'Mount point' as '/'. Then click 'OK'.
If you choose a different file system type (btrfs, JFS, XFS) pay attention for 'btrfs' file system. In this case see here for the correct 'btrfs' file system handling in Step 4.
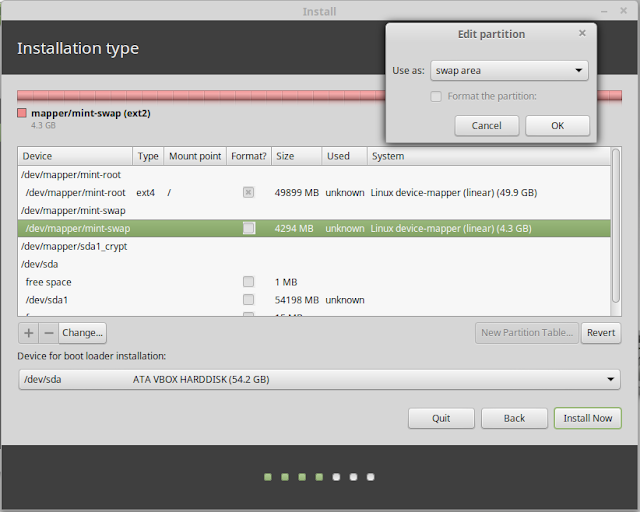
Select '/dev/mapper/mint-swap', click 'Change' and select 'Use as' as 'swap area' from the dropdown menu, then click 'OK'.

Select the free space at the end of the disk and press '+', from the dropdown menu select 'Use as' as 'Reserved BIOS boot area', then click 'OK'. Finally click 'Install Now'.

A popoup window named 'Write the changes to disks ?' will appear. Click 'Continue'.
Select your timezone and then click 'Continue'
Select your keyboard and then click 'Continue'
Choose your username and password and then click 'Continue'
Wait until Ubiquity show a popup like that ...

Click 'Continue Testing'. Ubiquity will ends.
Step 4
Now we have a Linux system build by Ubiquity that we must remount, fix, patch and update.
Go back to the Terminal window and commit the following 6 commands:

sudo mount /dev/mapper/mint-root /mnt
sudo mount --bind /dev /mnt/dev
sudo mount --bind /dev/pts /mnt/dev/pts
sudo mount --bind /sys /mnt/sys
sudo mount --bind /proc /mnt/proc
sudo mount --bind /run /mnt/run
These commands mount the Linux system, previusly build by Ubiquity, in the directory /mnt.
If you have chosen a 'btrfs' type filesystem for your '/dev/mapper/mint-root' device you must substitute the first command
sudo mount /dev/mapper/mint-root /mnt
with this new one
sudo mount -o subvol=@ /dev/mapper/mint-root /mnt
You will get a few warnings during GRUB installation but it seems working correctly anyway. If you need more detail about using 'btrfs' filesystem with LUKS/dm-crypt you can read the ArchLinux wiki at 'https://wiki.archlinux.org/index.php/Dm-crypt/Encrypting_an_entire_system#Btrfs_subvolumes_with_swap', paragraph 'Mount top-level subvolumes'.
-----
Now commit the following 4 commands:

The second command in this list of 4 will ask for the password of the encrypted volume. When the
script 'Enter any passphrase:' appear enter it.
sudo dd bs=512 count=4 if=/dev/urandom of=/mnt/boot/crypto_keyfile.bin
sudo cryptsetup luksAddKey /dev/sda1 /mnt/boot/crypto_keyfile.bin
sudo chmod 000 /mnt/boot/crypto_keyfile.bin
sudo chmod -R g-rwx,o-rwx /mnt/boot
These commands create a keyfile for automatic mounting of the encrypted volume when GRUB process ends. For more details see the articles of Pavel Kogan at http://www.pavelkogan.com.
-----
Now commit the following 2 commands:

echo "cp /boot/crypto_keyfile.bin \"\${DESTDIR}\"" | sudo tee -a /mnt/etc/initramfs-tools/hooks/crypto_keyfile
sudo chmod +x /mnt/etc/initramfs-tools/hooks/crypto_keyfile
These commands create the hook required by initramfs for the keyfile loading. For more details see the articles of Pavel Kogan at http://www.pavelkogan.com.
Otherwise you can create the hook file with sudo gedit /mnt/etc/initramfs-tools/hooks/crypto_keyfile and insert this line inside: cp /boot/crypto_keyfile.bin "${DESTDIR}"
-----
Now commit the following command:

echo "sda1_crypt UUID=`sudo blkid -s UUID -o value /dev/sda1` /crypto_keyfile.bin luks,keyscript=/bin/cat" | sudo tee -a /mnt/etc/crypttab
This command update the crypttab file. For more details see the articles of Pavel Kogan at http://www.pavelkogan.com and the tutorial from the Ubuntu Official Documentation page at https://help.ubuntu.com/community/EncryptedFilesystemsViaUbiquity
-----
Now commit the following 2 commands:

sudo chroot /mnt locale-gen --purge --no-archive
sudo chroot /mnt update-initramfs -u
These commands update the initramfs
-----
Now commit the following 3 commands:

sudo sed -i.bak 's/GRUB_HIDDEN_TIMEOUT=0/#GRUB_HIDDEN_TIMEOUT=0/' /mnt/etc/default/grub
sudo sed -i '10a GRUB_ENABLE_CRYPTODISK=y' /mnt/etc/default/grub
sudo sed -i 's/GRUB_CMDLINE_LINUX=""/GRUB_CMDLINE_LINUX="cryptdevice=\\\\\\\\\\\\\\\\\\\\\\\\\\\\\\\\\\\\\\\\\\\\\\\\\\\\\\\\\\\\\\\\\\\\\\\\\\\\\\\\\\\\\\\\\\\\\\\\\\\\\\\\\\\\\\\\\\\\\\\\\\\\\\\\\\\\\\\\\\\\\\\\\\\\\\\\\\\\\\\\\\\\\\\\\\\\\\\\\\\\\\\\\\\\\\\\\\\\\\\\\\\\\\\\\\\\\\\\\\\\\\\\\\\\\\\\\\\\\\\\\\\\\\\\\\\\\\\\\\\\\\\\\\\\\\\\\\\\\\\\\\\\\\\\\\\\\\\\\\\\\\\\\\\\\\\\\\\\\\\\\\\\\\\\\\\\\\\\\\\\\\\\\\\\\\\\\\\\\\\\\\\\\\\\\\\\\\\\\\\\\\\\\\\\\\\\\\\\\\\\\\\\\\\\\\\\\\\\\\\\\\\\\\\\\\\\\\\\\\\\\\\\\\\\\\\\\\\\\\\\\\\\\\\\\\\\\\\\\\\\\\\\\\\\\\\\\\\\\\\\\\\\\\\\\\\\\\\\\\\\\\\\\\\\\\\\\\\\\\\\\\\\\\\\\\\\\\\\\\\\\\\\\\\\\\\\\\\\\\\\\\\\\\\\\\\\\\\\\\\\\\\\\\\\\\\\\\\\\\\\\\\\\\\\\\\\\\\\\\\\\\\\\\\\\\\\\\\\\\\\\\\\\\\\\\\\\\\\\\\\\\\\\\\\\\\\\\\\\\\\\\\\\\\\\\\\\\\\\\\\\\\\\\\\\\\\\\\\\\\\\\\\\\\\\\\\\\\\\\\\\\\\\\\\\\\\\\\\\\\\\\\\\\\\\\\\\\\\\\\\\\\\\\\\\\\\\\\\\\\\\\\\\\\\\\\\\\\\\\\\\\\\\\\\\\\\\\\\\\\\\\\\\\\\\\\\\\\\\\\\\\\\\\\\\\\\\\\\\\\\\\\\\\\\\\\\\\\\\\\\\\\\\\\\\\\\\\\\\\\\\\\\\\\\\\\\\\\\\\\\\\\\\\\\\\\\\\\\\\\\\\\\\\\\\\\\\\\\\\\\\\\\\\\\\\\\\\\\\\\\\\\\\\\\\\\\\\\\\\\\\\\\\\\\\\\\\\\\\\\\\\\\\\\\\\\\\\\\\\\\\\\\\\\\\\\\\\\\\\\\\\\\\\\\\\\\\\\\\\\\\\\\\\\\\\\\\\\\\\\\\\\\\\\\\\\\\\\\\\\\\\\\\\\\\\\\\\\\\\\\\\\\\\\\\\\\\\\\\\\\\\\\\\\\\\\\\\\\\\\\\\\\\\\\\\\\\\\\\\\\\\\\\\\\\\\\\\\\\\\\\\\\\\\\\\\\\\\\\\\\\\\\\\\\\\\\\\\\\\\\\\\\\\\\\\\\\\\\\\\\\\\\\\\\\\\\\\\\\\\\\\\\\\\\\\\\\\\\\\\\\\\\\\\\\\\\\\\\\\\\\\\\\\\\\\\\\\\\\\\\\\\\\\\\\\\\\\\\\\\\\\\\\\\\\\\\\\\\\\\\\\\\\\\\\\\\\\\\\\\\\\\\\\\\\\\\\\\\\\\\\\\\\\\\\\\\\\\\\\\\\\\\\\\\\\\\\\\\\\\\\\\\\\\\\\\\\\\\\\\\\\\\\\\\\\\\\\\\\\\\\\\\\\\\\\\\\\\\\\\\\\\\\\\\\\\\\\\\\\\\\\\\\\\\\\\\\\\\\\\\\\\\\\\\\\\\\\\\\\\\\\\\\\\\\\\\\\\\\\\\\\\\\\\\\\\\\\\\\\\\\\\\\\\\\\\\\\\\\\\\\\\\\\\\\\\\\\\\\\\\\\\\\\\\\\\\\\\\\\\\\\\\\\\\\\\\\\\\\\\\\\\\\\\\\\\\\\\\\\\\\\\\\\\\\\\\\\\\\\\\\\\\\\\\\\\\\\\\\\\\\\\\\\\\\\\\\\\\\\\\\\\\\\\\\\\\\\\\\\\\\\\\\\\\\\\\\\\\\\\\\\\\\\\\\\\\\\\\\\\\\\\\\\\\\\\\\\\\\\\\\\\\\\\\\\\\\\\\\\\\\\\\\\\\\\\\\\\\\\\\\\\\\\\\\\\\\\\\\\\\\\\\\\\\\\\\\\\\\\\\\\\\\\\\\\\\\\\\\\\\\\\\\\\\\\\\\\\\\\\\\\\\\\\\\\\\\\\\\\\\\\\\\\\\\\\\\\\\\\\\\\\\\\\\\\\\\\\\\\\\\\\\\\\\\\\\\\\\\\\\\\\\\\\\\\\\\\\\\\\\\\\\\\\\\\\\\\\\\\\\\\\\\\\\\\\\\\\\\\\\\\\\\\\\\\\\\\\\\\\\\\\\\\\\\\\\\\\\\\\\\\\\\\\\\\\\\\\\\\\\\\\\\\\\\\\\\\\\\\\\\\\\\\\\\\\\\\\\\\\\\\\\\\\\\\\\\\\\\\\\\\\\\\\\\\\\\\\\\\\\\\\\\\\\\\\\\\\\\\\\\\\\\\\\\\\\\\\\\\\\\\\\\\\\\\\\\\\\\\\\\\\\\\\\\\\\\\\\\\\\\\\\\\\\\\\\\\\\\\\\\\\\\\\\\\\\\\\\\\\\\\\\\\\\\\\\\\\\\\\\\\\\\\\\\\\\\\\\\\\\\\\\\\\\\\\\\\\\\\\\\\\\\\\\\\\\\\\\\\\\\\\\\\\\\\\\\\\\\\\\\\\\\\\\\\\\\\\\\\\\\\\\\\\\\\\\\\\\\\\\\\\\\\\\\\\\\\\\\\\\\\\\\\\\\\\\\\\\\\\\\\\\\\\\\\\\\\\\\\\\\\\\\\\\\\\\\\\\\\\\\\\\\\\\\\\\\\\\\\\\\\\\\\\\\\\\\\\\\\\\\\\\\\\\\\\\\\\\\\\\\\\\\\\\\\\\\\\\\\\\\\\\\\\\\\\\\\\\\\\\\\\\\\\\\\\\\\\\\\\\\\\\\\\\\\\\\\\\\\\\\\\\\\\\\\\\\\\\\\\\\\\\\\\\\\\\\\\\\\\\\\\\\\\\\\\\\\\\\\\\\\\\\\\\\\\\\\\\\\\\\\\\\\\\\\\\\\\\\\\\\\\\\\\\\\\\\\\\\\\\\\\\\\\\\\\\\\\\\\\\\\\\\\\\\\\\\\\\\\\\\\\\\\\\\\\\\\\\\\\\\\\\\\\\\\\\\\\\\\\\\\\\\\\\\\\\\\\\\\\\\\\\\\\\\\\\\\\\\\\\\\\\\\\\\\\\\\\\\\\\\\\\\\\\\\\\\\\\\\\\\\\\\\\\\\\\\\\\\\\\\\\\\\\\\\\\\\\\\\\\\\\\\\\\\\\\\\\\\\\\\\\\\\\\\\\\\\\\\\\\\\\\\\\\\\\\\\\\\\\\\\\\\\\\\\\\\\\\\\\\\\\\\\\\\\\\\\\\\\\\\\\\\\\\\\\\\\\\\\\\\\\\\\\\\\\\\\\\\\\\\\\\\\\\\\\\\\\\\\\\\\\\\\\\\\\\\\\\\\\\\\\\\\\\\\\\\\\\\\\\\\\\\\\\\\\\\\\\\\\\\\\\\\\\\\\\\\\\\\\\\\\\\\\\\\\\\\\\\\\\\\\\\\\\\\\\\\\\\\\\\\\\\\\\\\\\\\\\\\\\\\\\\\\\\\\\\\\\\\\\\\\\\\\\\\\\\\\\\\\\\\\\\\\\\\\\\\\\\\\\\\\\\\\\\\\\\\\\\\\\\\\\\\\\\\\\\\\\\\\\\\\\\\\\\\\\\\\\\\\\\\\\\\\\\\\\\\\\\\\\\\\\\\\\\\\\\\\\\\\\\\\\\\\\\\\\\\\\\\\\\\\\\\\\\\\\\\\\\\\\\\\\\\\\\\\\\\\\\\\\\\\\\\\\\\\\\\\\\\\\\\\\\\\\\\\\\\\\\\\\\\\\\\\\\\\\\\\\\\\\\\\\\\\\\\\\\\\\\\\\\\\\\\\\\\\\\\\\\\\\\\\\\\\\\\\\\\\\\\\\\\\\\\\\\\\\\\\\\\\\\\\\\\\\\\\\\\\\\\\\\\\\\\\\\\\\\\\\\\\\\\\\\\\\\\\\\\\\\\\\\\\\\\\\\\\\\\\\\\\\\\\\\\\\\\\\\\\\\\\\\\\\\\\\\\\\\\\\\\\\\\\\\\\\\\\\\\\\\\\\\\\\\\\\\\\\\\\\\\\\\\\\\\\\\\\\\\\\\\\\\\\\\\\\\\\\\\\\\\\\\\\\\\\\\\\\\\\\\\\\\\\\\\\\\\\\\\\\\\\\\\\\\\\\\\\\\\\\\\\\\\\\\\\\\\\\\\\\\\\\\\\\\\\\\\\\\\\\\\\\\\\\\\\\\\\\\\\\\\\\\\\\\\\\\\\\\\\\\\\\\\\\\\\\\\\\\\\\\\\\\\\\\\\\\\\\\\\\\\\\\\\\\\\\\\\\\\\\\\\\\\\\\\\\\\\\\\\\\\\\\\\\\\\\\\\\\\\\\\\\\\\\\\\\\\\\\\\\\\\\\\\\\\\\\\\\\\\\\\\\\\\\\\\\\\\\\\\\\\\\\\\\\\\\\\\\\\\\\\\\\\\\\\\\\\\\\\\\\\\\\\\\\\\\\\\\\\\\\\\\\\\\\\\\\\\\\\\\\\\\\\\\\\\\\\\\\\\\\\\\\\\\\\\\\\\\\\\\\\\\\\\\\\\\\\\\\\\\\\\\\\\\\\\\\\\\\\\\\\\\\\\\\\\\\\\\\\\\\\\\\\\\\\\\\\\\\\\\\\\\\\\\\\\\\\\\\\\\\\\\\\\\\\\\\\\\\\\\\\\\\\\\\\\\\\\\\\\\\\\\\\\\\\\\\\\\\\\\\\\\\\\\\\\\\\\\\\\\\\\\\\\\\\\\\\\\\\\\\\\\\\\\\\\\\\\\\\\\\\\\\\\\\\\\\\\\\\\\\\\\\\\\\\\\\\\\\\\\\\\\\\\\\\\\\\\\\\\\\\\\\\\\\\\\\\\\\\\\\\\\\\\\\\\\\\\\\\\\\\\\\\\\\\\\\\\\\\\\\\\\\\\\\\\\\\\\\\\\\\\\\\\\\\\\\\\\\\\\\\\\\\\\\\\\\\\\\\\\\\\\\\\\\\\\\\\\\\\\\\\\\\\\\\\\\\\\\\\\\\\\\\\\\\\\\\\\\\\\\\\\\\\\\\\\\\\\\\\\\\\\\\\\\\\\\\\\\\\\\\\\\\\\\\\\\\\\\\\\\\\\\\\\\\\\\\\\\\\\\\\\\\\\\\\\\\\\\\\\\\\\\\\\\\\\\\\\\\\\\\\\\\\\\\\\\\\\\\\\\\\\\\\\\\\\\\\\\\\\\\\\\\\\\\\\\\\\\\\\\\\\\\\\\\\\\\\\\\\\\\\\\\\\\\\\\\\\\\\\\\\\\\\\\\\\\\\\\\\\\\\\\\\\\\\\\\\\\\\\\\\\\\\\\\\\\\\\\\\\\\\\\\\\\\\\\\\\\\\\\\\\\\\\\\\\\\\\\\\\\\\\\\\\\\\\\\\\\\\\\\\\\\\\\\\\\\\\\\\\\\\\\\\\\\\\\\\\\\\\\\\\\\\\\\\\\\\\\\\\\\\\\\\\\\\\\\\\\\\\\\\\\\\\\\\\\\\\\\\\\\\\\\\\\\\\\\\\\\\\\\\\\\\\\\\\\\\\\\\\\\\\\\\\\\\\\\\\\\\\\\\\\\\\\\\\\\\\\\\\\\\\\\\\\\\\\\\\\\\\\\\\\\\\\\\\\\\\\\\\\\\\\\\\\\\\\\\\\\\\\\\\\\\\\\\\\\\\\\\\\\\\\\\\\\\\\\\\\\\\\\\\\\\\\\\\\\\\\\\\\\\\\\\\\\\\\\\\\\\\\\\\\\\\\\\\\\\\\\\\\\\\\\\\\\\\\\\\\\\\\\\\\\\\\\\\\\\\\\\\\\\\\\\\\\\\\\\\\\\\\\\\\\\\\\\\\\\\\\\\\\\\\\\\\\\\\\\\\\\\\\\\\\\\\\\\\\\\\\\\\\\\\\\\\\\\\\\\\\\\\\\\\\\\\\\\\\\\\\\\\\\\\\\\\\\\\\\\\\\\\\\\\\\\\\\\\\\\\\\\\\\\\\\\\\\\\\\\\\\\\\\\\\\\\\\\\\\\\\\\\\\\\\\\\\\\\\\\\\\\\\\\\\\\\\\\\\\\\\\\\\\\\\\\\\\\\\\\\\\\\\\\\\\\\\\\\\\\\\\\\\\\\\\\\\\\\\\\\\\\\\\\\\\\\\\\\\\\\\\\\\\\\\\\\\\\\\\\\\\\\\\\\\\\\\\\\\\\\\\\\\\\\\\\\\\\\\\\\\\\\\\\\\\\\\\\\\\\\\\\\\\\\\\\\\\\\\\\\\\\\\\\\\\\\\\\\\\\\\\\\\\\\\\\\\\\\\\\\\\\\\\\\\\\\\\\\\\\\\\\\\\\\\\\\\\\\\\\\\\\\\\\\\\\\\\\\\\\\\\\\\\\\\\\\\\\\\\\\\\\\\\\\\\\\\\\\\\\\\\\\\\\\\\\\\\\\\\\\\\\\\\\\\\\\\\\\\\\\\\\\\\\\\\\\\\\\\\\\\\\\\\\\\\\\\\\\\\\\\\\\\\\\\\\\\\\\\\\\\\\\\\\\\\\\\\\\\\\\\\\\\\\\\\\\\\\\\\\\\\\\\\\\\\\\\\\\\\\\\\\\\\\\\\\\\\\\\\\\\\\\\\\\\\\\\\\\\\\\\\\\\\\\\\\\\\\\\\\\\\\\\\\\\\\\\\\\\\\\\\\\\\\\\\\\\\\\\\\\\\\\\\\\\\\\\\\\\\\\\\\\\\\\\\\\\\\\\\\\\\\\\\\\\\\\\\\\\\\\\\\\\\\\\\\\\\\\\\\\\\\\\\\\\\\\\\\\\\\\\\\\\\\\\\\\\\\\\\\\\\\\\\\\\\\\\\\\\\\\\\\\\\\\\\\\\\\\\\\\\\\\\\\\\\\\\\\\\\\\\\\\\\\\\\\\\\\\\\\\\\\\\\\\\\\\\\\\\\\\\\\\\\\\\\\\\\\\\\\\\\\\\\\\\\\\\\\\\\\\\\\\\\\\\\\\\\\\\\\\\\\\\\\\\\\\\\\\\\\\\\\\\\\\\\\\\\\\\\\\\\\\\\\\\\\\\\\\\\\\\\\\\\\\\\\\\\\\\\\\\\\\\\\\\\\\\\\\\\\\\\\\\\\\\\\\\\\\\\\\\\\\\\\\\\\\\\\\\\\\\\\\\\\\\\\\\\\\\\\\\\\\\\\\\\\\\\\\\\\\\\\\\\\\\\\\\\\\\\\\\\\\\\\\\\\\\\\\\\\\\\\\\\\\\\\\\\\\\\\\\\\\\\\\\\\\\\\\\\\\\\\\\\\\\\\\\\\\\\\\\\\\\\\\\\\\\\\\\\\\\\\\\\\\\\\\\\\\\\\\\\\\\\\\\\\\\\\\\\\\\\\\\\\\\\\\\\\\\\\\\\\\\\\\\\\\\\\\\\\\\\\\\\\\\\\\\\\\\\\\\\\\\\\\\\\\\\\\\\\\\\\\\\\\\\\\\\\\\\\\\\\\\\\\\\\\\\\\\\\\\\\\\\\\\\\\\\\\\\\\\\\\\\\\\\\\\\\\\\\\\\\\\\\\\\\\\\\\\\\\\\\\\\\\\\\\\\\\\\\\\\\\\\\\\\\\\\\\\\\\\\\\\\\\\\\\\\\\\\\\\\\\\\\\\\\\\\\\\\\\\\\\\\\\\\\\\\\\\\\\\\\\\\\\\\\\\\\\\\\\\\\\\\\\\\\\\\\\\\\\\\\\\\\\\\\\\\\\\\\\\\\\\\\\\\\\\\\\\\\\\\\\\\\\\\\\\\\\\\\\\\\\\\\\\\\\\\\\\\\\\\\\\\\\\\\\\\\\\\\\\\\\\\\\\\\\\\\\\\\\\\\\\\\\\\\\\\\\\\\\\\\\\\\\\\\\\\\\\\\\\\\\\\\\\\\\\\\\\\\\\\\\\\\\\\\\\\\\\\\\\\\\\\\\\\\\\\\\\\\\\\\\\\\\\\\\\\\\\\\\\\\\\\\\\\\\\\\\\\\\\\\\\\\\\\\\\\\\\\\\\\\\\\\\\\\\\\\\\\\\\\\\\\\\\\\\\\\\\\\\\\\\\\\\\\\\\\\\\\\\\\\\\\\\\\\\\\\\\\\\\\\\\\\\\\\\\\\\\\\\\\\\\\\\\\\\\\\\\\\\\\\\\\\\\\\\\\\\\\\\\\\\\\\\\\\\\\\\\\\\\\\\\\\\\\\\\\\\\\\\\\\\\\\\\\\\\\\\\\\\\\\\\\\\\\\\\\\\\\\\\\\\\\\\\\\\\\\\\\\\\\\\\\\\\\\\\\\\\\\\\\\\\\\\\\\\\\\\\\\\\\\\\\\\\\\\\\\\\\\\\\\\\\\\\\\\\\\\\\\\\\\\\\\\\\\\\\\\\\\\\\\\\\\\\\\\\\\\\\\\\\\\\\\\\\\\\\\\\\\\\\\\\\\\\\\\\\\\\\\\\\\\\\\\\\\\\\\\\\\\\\\\\\\\\\\\\\\\\\\\\\\\\\\\\\\\\\\\\\\\\\\\\\\\\\\\\\\\\\\\\\\\\\\\\\\\\\\\\\\\\\\\\\\\\\\\\\\\\\\\\\\\\\\\\\\\\\\\\\\\\\\\\\\\\\\\\\\\\\\\\\\\\\\\\\\\\\\\\\\/dev\\\\\\\\\\\\\\\\\\\\\\\\\\\\\\\\\\\\\\\\\\\\\\\\\\\\\\\\\\\\\\\\\\\\\\\\\\\\\\\\\\\\\\\\\\\\\\\\\\\\\\\\\\\\\\\\\\\\\\\\\\\\\\\\\\\\\\\\\\\\\\\\\\\\\\\\\\\\\\\\\\\\\\\\\\\\\\\\\\\\\\\\\\\\\\\\\\\\\\\\\\\\\\\\\\\\\\\\\\\\\\\\\\\\\\\\\\\\\\\\\\\\\\\\\\\\\\\\\\\\\\\\\\\\\\\\\\\\\\\\\\\\\\\\\\\\\\\\\\\\\\\\\\\\\\\\\\\\\\\\\\\\\\\\\\\\\\\\\\\\\\\\\\\\\\\\\\\\\\\\\\\\\\\\\\\\\\\\\\\\\\\\\\\\\\\\\\\\\\\\\\\\\\\\\\\\\\\\\\\\\\\\\\\\\\\\\\\\\\\\\\\\\\\\\\\\\\\\\\\\\\\\\\\\\\\\\\\\\\\\\\\\\\\\\\\\\\\\\\\\\\\\\\\\\\\\\\\\\\\\\\\\\\\\\\\\\\\\\\\\\\\\\\\\\\\\\\\\\\\\\\\\\\\\\\\\\\\\\\\\\\\\\\\\\\\\\\\\\\\\\\\\\\\\\\\\\\\\\\\\\\\\\\\\\\\\\\\\\\\\\\\\\\\\\\\\\\\\\\\\\\\\\\\\\\\\\\\\\\\\\\\\\\\\\\\\\\\\\\\\\\\\\\\\\\\\\\\\\\\\\\\\\\\\\\\\\\\\\\\\\\\\\\\\\\\\\\\\\\\\\\\\\\\\\\\\\\\\\\\\\\\\\\\\\\\\\\\\\\\\\\\\\\\\\\\\\\\\\\\\\\\\\\\\\\\\\\\\\\\\\\\\\\\\\\\\\\\\\\\\\\\\\\\\\\\\\\\\\\\\\\\\\\\\\\\\\\\\\\\\\\\\\\\\\\\\\\\\\\\\\\\\\\\\\\\\\\\\\\\\\\\\\\\\\\\\\\\\\\\\\\\\\\\\\\\\\\\\\\\\\\\\\\\\\\\\\\\\\\\\\\\\\\\\\\\\\\\\\\\\\\\\\\\\\\\\\\\\\\\\\\\\\\\\\\\\\\\\\\\\\\\\\\\\\\\\\\\\\\\\\\\\\\\\\\\\\\\\\\\\\\\\\\\\\\\\\\\\\\\\\\\\\\\\\\\\\\\\\\\\\\\\\\\\\\\\\\\\\\\\\\\\\\\\\\\\\\\\\\\\\\\\\\\\\\\\\\\\\\\\\\\\\\\\\\\\\\\\\\\\\\\\\\\\\\\\\\\\\\\\\\\\\\\\\\\\\\\\\\\\\\\\\\\\\\\\\\\\\\\\\\\\\\\\\\\\\\\\\\\\\\\\\\\\\\\\\\\\\\\\\\\\\\\\\\\\\\\\\\\\\\\\\\\\\\\\\\\\\\\\\\\\\\\\\\\\\\\\\\\\\\\\\\\\\\\\\\\\\\\\\\\\\\\\\\\\\\\\\\\\\\\\\\\\\\\\\\\\\\\\\\\\\\\\\\\\\\\\\\\\\\\\\\\\\\\\\\\\\\\\\\\\\\\\\\\\\\\\\\\\\\\\\\\\\\\\\\\\\\\\\\\\\\\\\\\\\\\\\\\\\\\\\\\\\\\\\\\\\\\\\\\\\\\\\\\\\\\\\\\\\\\\\\\\\\\\\\\\\\\\\\\\\\\\\\\\\\\\\\\\\\\\\\\\\\\\\\\\\\\\\\\\\\\\\\\\\\\\\\\\\\\\\\\\\\\\\\\\\\\\\\\\\\\\\\\\\\\\\\\\\\\\\\\\\\\\\\\\\\\\\\\\\\\\\\\\\\\\\\\\\\\\\\\\\\\\\\\\\\\\\\\\\\\\\\\\\\\\\\\\\\\\\\\\\\\\\\\\\\\\\\\\\\\\\\\\\\\\\\\\\\\\\\\\\\\\\\\\\\\\\\\\\\\\\\\\\\\\\\\\\\\\\\\\\\\\\\\\\\\\\\\\\\\\\\\\\\\\\\\\\\\\\\\\\\\\\\\\\\\\\\\\\\\\\\\\\\\\\\\\\\\\\\\\\\\\\\\\\\\\\\\\\\\\\\\\\\\\\\\\\\\\\\\\\\\\\\\\\\\\\\\\\\\\\\\\\\\\\\\\\\\\\\\\\\\\\\\\\\\\\\\\\\\\\\\\\\\\\\\\\\\\\\\\\\\\\\\\\\\\\\\\\\\\\\\\\\\\\\\\\\\\\\\\\\\\\\\\\\\\\\\\\\\\\\\\\\\\\\\\\\\\\\\\\\\\\\\\\\\\\\\\\\\\\\\\\\\\\\\\\\\\\\\\\\\\\\\\\\\\\\\\\\\\\\\\\\\\\\\\\\\\\\\\\\\\\\\\\\\\\\\\\\\\\\\\\\\\\\\\\\\\\\\\\\\\\\\\\\\\\\\\\\\\\\\\\\\\\\\\\\\\\\\\\\\\\\\\\\\\\\\\\\\\\\\\\\\\\\\\\\\\\\\\\\\\\\\\\\\\\\\\\\\\\\\\\\\\\\\\\\\\\\\\\\\\\\\\\\\\\\\\\\\\\\\\\\\\\\\\\\\\\\\\\\\\\\\\\\\\\\\\\\\\\\\\\\\\\\\\\\\\\\\\\\\\\\\\\\\\\\\\\\\\\\\\\\\\\\\\\\\\\\\\\\\\\\\\\\\\\\\\\\\\\\\\\\\\\\\\\\\\\\\\\\\\\\\\\\\\\\\\\\\\\\\\\\\\\\\\\\\\\\\\\\\\\\\\\\\\\\\\\\\\\\\\\\\\\\\\\\\\\\\\\\\\\\\\\\\\\\\\\\\\\\\\\\\\\\\\\\\\\\\\\\\\\\\\\\\\\\\\\\\\\\\\\\\\\\\\\\\\\\\\\\\\\\\\\\\\\\\\\\\\\\\\\\\\\\\\\\\\\\\\\\\\\\\\\\\\\\\\\\\\\\\\\\\\\\\\\\\\\\\\\\\\\\\\\\\\\\\\\\\\\\\\\\\\\\\\\\\\\\\\\\\\\\\\\\\\\\\\\\\\\\\\\\\\\\\\\\\\\\\\\\\\\\\\\\\\\\\\\\\\\\\\\\\\\\\\\\\\\\\\\\\\\\\\\\\\\\\\\\\\\\\\\\\\\\\\\\\\\\\\\\\\\\\\\\\\\\\\\\\\\\\\\\\\\\\\\\\\\\\\\\\\\\\\\\\\\\\\\\\\\\\\\\\\\\\\\\\\\\\\\\\\\\\\\\\\\\\\\\\\\\\\\\\\\\\\\\\\\\\\\\\\\\\\\\\\\\\\\\\\\\\\\\\\\\\\\\\\\\\\\\\\\\\\\\\\\\\\\\\\\\\\\\\\\\\\\\\\\\\\\\\\\\\\\\\\\\\\\\\\\\\\\\\\\\\\\\\\\\\\\\\\\\\\\\\\\\\\\\\\\\\\\\\\\\\\\\\\\\\\\\\\\\\\\\\\\\\\\\\\\\\\\\\\\\\\\\\\\\\\\\\\\\\\\\\\\\\\\\\\\\\\\\\\\\\\\\\\\\\\\\\\\\\\\\\\\\\\\\\\\\\\\\\\\\\\\\\\\\\\\\\\\\\\\\\\\\\\\\\\\\\\\\\\\\\\\\\\\\\\\\\\\\\\\\\\\\\\\\\\\\\\\\\\\\\\\\\\\\\\\\\\\\\\\\\\\\\\\\\\\\\\\\\\\\\\\\\\\\\\\\\\\\\\\\\\\\\\\\\\\\\\\\\\\\\\\\\\\\\\\\\\\\\\\\\\\\\\\\\\\\\\\\\\\\\\\\\\\\\\\\\\\\\\\\\\\\\\\\\\\\\\\\\\\\\\\\\\\\\\\\\\\\\\\\\\\\\\\\\\\\\\\\\\\\\\\\\\\\\\\\\\\\\\\\\\\\\\\\\\\\\\\\\\\\\\\\\\\\\\\\\\\\\\\\\\\\\\\\\\\\\\\\\\\\\\\\\\\\\\\\\\\\\\\\\\\\\\\\\\\\\\\\\\\\\\\\\\\\\\\\\\\\\\\\\\\\\\\\\\\\\\\\\\\\\\\\\\\\\\\\\\\\\\\\\\\\\\\\\\\\\\\\\\\\\\\\\\\\\\\\\\\\\\\\\\\\\\\\\\\\\\\\\\\\\\\\\\\\\\\\\\\\\\\\\\\\\\\\\\\\\\\\\\\\\\\\\\\\\\\\\\\\\\\\\\\\\\\\\\\\\\\\\\\\\\\\\\\\\\\\\\\\\\\\\\\\\\\\\\\\\\\\\\\\\\\\\\\\\\\\\\\\\\\\\\\\\\\\\\\\\\\\\\\\\\\\\\\\\\\\\\\\\\\\\\\\\\\\\\\\\\\\\\\\\\\\\\\\\\\\\\\\\\\\\\\\\\\\\\\\\\\\\\\\\\\\\\\\\\\\\\\\\\\\\\\\\\\\\\\\\\\\\\\\\\\\\\\\\\\\\\\\\\\\\\\\\\\\\\\\\\\\\\\\\\\\\\\\\\\\\\\\\\\\\\\\\\\\\\\\\\\\\\\\\\\\\\\\\\\\\\\\\\\\\\\\\\\\\\\\\\\\\\\\\\\\\\\\\\\\\\\\\\\\\\\\\\\\\\\\\\\\\\\\\\\\\\\\\\\\\\\\\\\\\\\\\\\\\\\\\\\\\\\\\\\\\\\\\\\\\\\\\\\\\\\\\\\\\\\\\\\\\\\\\\\\\\\\\\\\\\\\\\\\\\\\\\\\\\\\\\\\\\\\\\\\\\\\\\\\\\\\\\\\\\\\\\\\\\\\\\\\\\\\\\\\\\\\\\\\\\\\\\\\\\\\\\\\\\\\\\\\\\\\\\\\\\\\\\\\\\\\\\\\\\\\\\\\\\\\\\\\\\\\\\\\\\\\\\\\\\\\\\\\\\\\\\\\\\\\\\\\\\\\\\\\\\\\\\\\\\\\\\\\\\\\\\\\\\\\\\\\\\\\\\\\\\\\\\\\\\\\\\\\\\\\\\\\\\\\\\\\\\\\\\\\\\\\\\\\\\\\\\\\\\\\\\\\\\\\\\\\\\\\\\\\\\\\\\\\\\\\\\\\\\\\\\\\\\\\\\\\\\\\\\\\\\\\\\\\\\\\\\\\\\\\\\\\\\\\\\\\\\\\\\\\\\\\\\\\\\\\\\\\\\\\\\\\\\\\\\\\\\\\\\\\\\\\\\\\\\\\\\\\\\\\\\\\\\\\\\\\\\\\\\\\\\\\\\\\\\\\\\\\\\\\\\\\\\\\\\\\\\\\\\\\\\\\\\\\\\\\\\\\\\\\\\\\\\\\\\\\\\\\\\\\\\\\\\\\\\\\\\\\\\\\\\\\\\\\\\\\\\\\\\\\\\\\\\\\\\\\\\\\\\\\\\\\\\\\\\\\\\\\\\\\\\\\\\\\\\\\\\\\\\\\\\\\\\\\\\\\\\\\\\\\\\\\\\\\\\\\\\\\\\\\\\\\\\\\\\\\\\\\\\\\\\\\\\\\\\\\\\\\\\\\\\\\\\\\\\\\\\\\\\\\\\\\\\\\\\\\\\\\\\\\\\\\\\\\\\\\\\\\\\\\\\\\\\\\\\\\\\\\\\\\\\\\\\\\\\\\\\\\\\\\\\\\\\\\\\\\\\\\\\\\\\\\\\\\\\\\\\\\\\\\\\\\\\\\\\\\\\\\\\\\\\\\\\\\\\\\\\\\\\\\\\\\\\\\\\\\\\\\\\\\\\\\\\\\\\\\\\\\\\\\\\\\\\\\\\\\\\\\\\\\\\\\\\\\\\\\\\\\\\\\\\\\\\\\\\\\\\\\\\\\\\\\\\\\\\\\\\\\\\\\\\\\\\\\\\\\\\\\\\\\\\\\\\\\\\\\\\\\\\\\\\\\\\\\\\\\\\\\\\\\\\\\\\\\\\\\\\\\\\\\\\\\\\\\\\\\\\\\\\\\\\\\\\\\\\\\\\\\\\\\\\\\\\\\\\\\\\\\\\\\\\\\\\\\\\\\\\\\\\\\\\\\\\\\\\\\\\\\\\\\\\\\\\\\\\\\\\\\\\\\\\\\\\\\\\\\\\\\\\\\\\\\\\\\\\\\\\\\\\\\\\\\\\\\\\\\\\\\\\\\\\\\\\\\\\\\\\\\\\\\\\\\\\\\\\\\\\\\\\\\\\\\\\\\\\\\\\\\\\\\\\\\\\\\\\\\\\\\\\\\\\\\\\\\\\\\\\\\\\\\\\\\\\\\\\\\\\\\\\\\\\\\\\\\\\\\\\\\\\\\\\\\\\\\\\\\\\\\\\\\\\\\\\\\\\\\\\\\\\\\\\\\\\\\\\\\\\\\\\\\\\\\\\\\\\\\\\\\\\\\\\\\\\\\\\\\\\\\\\\\\\\\\\\\\\\\\\\\\\\\\\\\\\\\\\\\\\\\\\\\\\\\\\\\\\\\\\\\\\\\\\\\\\\\\\\\\\\\\\\\\\\\\\\\\\\\\\\\\\\\\\\\\\\\\\\\\\\\\\\\\\\\\\\\\\\\\\\\\\\\\\\\\\\\\\\\\\\\\\\\\\\\\\\\\\\\\\\\\\\\\\\\\\\\\\\\\\\\\\\\\\\\\\\\\\\\\\\\\\\\\\\\\\\\\\\\\\\\\\\\\\\\\\\\\\\\\\\\\\\\\\\\\\\\\\\\\\\\\\\\\\\\\\\\\\\\\\\\\\\\\\\\\\\\\\\\\\\\\\\\\\\\\\\\\\\\\\\\\\\\\\\\\\\\\\\\\\\\\\\\\\\\\\\\\\\\\\\\\\\\\\\\\\\\\\\\\\\\\\\\\\\\\\\\\\\\\\\\\\\\\\\\\\\\\\\\\\\\\\\\\\\\\\\\\\\\\\\\\\\\\\\\\\\\\\\\\\\\\\\\\\\\\\\\\\\\\\\\\\\\\\\\\\\\\\\\\\\\\\\\\\\\\\\\\\\\\\\\\\\\\\\\\\\\\\\\\\\\\\\\\\\\\\\\\\\\\\\\\\\\\\\\\\\\\\\\\\\\\\\\\\\\\\\\\\\\\\\\\\\\\\\\\\\\\\\\\\\\\\\\\\\\\\\\\\\\\\\\\\\\\\\\\\\\\\\\\\\\\\\\\\\\\\\\\\\\\\\\\\\\\\\\\\\\\\\\\\\\\\\\\\\\\\\\\\\\\\\\\\\\\\\\\\\\\\\\\\\\\\\\\\\\\\\\\\\\\\\\\\\\\\\\\\\\\\\\\\\\\\\\\\\\\\\\\\\\\\\\\\\\\\\\\\\\\\\\\\\\\\\\\\\\\\\\\\\\\\\\\\\\\\\\\\\\\\\\\\\\\\\\\\\\\\\\\\\\\\\\\\\\\\\\\\\\\\\\\\\\\\\\\\\\\\\\\\\\\\\\\\\\\\\\\\\\\\\\\\\\\\\\\\\\\\\\\\\\\\\\\\\\\\\\\\\\\\\\\\\\\\\\\\\\\\\\\\\\\\\\\\\\\\\\\\\\\\\\\\\\\\\\\\\\\\\\\\\\\\\\\\\\\\\\\\\\\\\\\\\\\\\\\\\\\\\\\\\\\\\\\\\\\\\\\\\\\\\\\\\\\\\\\\\\\\\\\\\\\\\\\\\\\\\\\\\\\\\\\\\\\\\\\\\\\\\\\\\\\\\\\\\\\\\\\\\\\\\\\\\\\\\\\\\\\\\\\\\\\\\\\\\\\\\\\\\\\\\\\\\\\\\\\\\\\\\\\\\\\\\\\\\\\\\\\\\\\\\\\\\\\\\\\\\\\\\\\\\\\\\\\\\\\\\\\\\\\\\\\\\\\\\\\\\\\\\\\\\\\\\\\\\\\\\\\\\\\\\\\\\\\\\\\\\\\\\\\\\\\\\\\\\\\\\\\\\\\\\\\\\\\\\\\\\\\\\\\\\\\\\\\\\\\\\\\\\\\\\\\\\\\\\\\\\\\\\\\\\\\\\\\\\\\\\\\\\\\\\\\\\\\\\\\\\\\\\\\\\\\\\\\\\\\\\\\\\\\\\\\\\\\\\\\\\\\\\\\\\\\\\\\\\\\\\\\\\\\\\\\\\\\\\\\\\\\\\\\\\\\\\\\\\\\\\\\\\\\\\\\\\\\\\\\\\\\\\\\\\\\\\\\\\\\\\\\\\\\\\\\\\\\\\\\\\\\\\\\\\\\\\\\\\\\\\\\\\\\\\\\\\\\\\\\\\\\\\\\\\\\\\\\\\\\\\\\\\\\\\\\\\\\\\\\\\\\\\\\\\\\\\\\\\\\\\\\\\\\\\\\\\\\\\\\\\\\\\\\\\\\\\\\\\\\\\\\\\\\\\\\\\\\\\\\\\\\\\\\\\\\\\\\\\\\\\\\\\\\\\\\\\\\\\\\\\\\\\\\\\\\\\\\\\\\\\\\\\\\\\\\\\\\\\\\\\\\\\\\\\\\\\\\\\\\\\\\\\\\\\\\\\\\\\\\\\\\\\\\\\\\\\\\\\\\\\\\\\\\\\\\\\\\\\\\\\\\\\\\\\\\\\\\\\\\\\\\\\\\\\\\\\\\\\\\\\\\\\\\\\\\\\\\\\\\\\\\\\\\\\\\\\\\\\\\\\\\\\\\\\\\\\\\\\\\\\\\\\\\\\\\\\\\\\\\\\\\\\\\\\\\\\\\\\\\\\\\\\\\\\\\\\\\\\\\\\\\\\\\\\\\\\\\\\\\\\\\\\\\\\\\\\\\\\\\\\\\\\\\\\\\\\\\\\\\\\\\\\\\\\\\\\\\\\\\\\\\\\\\\\\\\\\\\\\\\\\\\\\\\\\\\\\\\\\\\\\\\\\\\\\\\\\\\\\\\\\\\\\\\/sda1:sda1_crypt"/' /mnt/etc/default/grub
These commands update the grub file. For more details see the articles of Pavel Kogan at http://www.pavelkogan.com.
Otherwise you can edit the grub file with sudo gedit /mnt/etc/default/grub and modify the directives inside in this way:
############################################################
GRUB_DEFAULT=0
#GRUB_HIDDEN_TIMEOUT=0
GRUB_HIDDEN_TIMEOUT_QUIET=true
GRUB_TIMEOUT=10
GRUB_DISTRIBUTOR=`lsb_release -i -s 2> /dev/null || echo Debian`
GRUB_ENABLE_CRYPTODISK=y
GRUB_CMDLINE_LINUX_DEFAULT="quiet splash"
GRUB_CMDLINE_LINUX="cryptdevice=/dev/sda1:sda1_crypt"
############################################################
-----
If you are installing Linux Mint 18.X or Ubuntu 16.X skip the following 4 commands !!!
Otherwise commit them.

sudo mv /mnt/etc/grub.d/00_header /mnt/etc/grub.d/00_header.orig
sudo wget -O /mnt/etc/grub.d/00_header https://gist.githubusercontent.com/rarylson/da6b77ad6edde25529b2/raw/99f266a10e663e1829efc25eca6eddb9412c6fdc/00_header_patched
sudo chmod -x /mnt/etc/grub.d/00_header.orig
sudo chmod +x /mnt/etc/grub.d/00_header
These commands patch the 00_header file, fixing the handling of RAID and LVM volumes in GRUB.
You can omit these four command but when your system boot up it will show a message like that
"Error: diskfilter writes are not supported. Press any key to continue...". The system go fuhrter anyway but it is noisy. For more details see the article of Rarylson Freitas at http://askubuntu.com/questions/468466/why-this-occurs-error-diskfilter-writes-are-not-supported.
-----
Now commit the following 3 commands:

sudo chroot /mnt update-grub
sudo chroot /mnt grub-mkconfig -o /boot/grub/grub.cfg
sudo chroot /mnt grub-install /dev/sda
These commands update GRUB
Although we choose /dev/sda as device for boot loader installation grub-install will detect the HDD GPT partitioning scheme and the presence of the partition reserved BIOS boot area, where the boot files of GRUB will be installed.
-----
Now start the file browser Nemo (or Nautilus in Ubuntu) and search for a file named /mnt/sbin/initctl.REAL.

If the file /mnt/sbin/initctl.REAL is present you must rename /mnt/sbin/initctl to /mnt/sbin/initctl.orig and then rename /mnt/sbin/initctl.REAL to /mnt/sbin/initctl, committing the following 2 commands:
sudo mv /mnt/sbin/initctl /mnt/sbin/initctl.orig
sudo mv /mnt/sbin/initctl.REAL /mnt/sbin/initctl
These commands rename the correct initctl file
-----
Now commit the last command:

sudo umount /mnt/proc /mnt/dev/pts /mnt/dev /mnt/sys /mnt/run /mnt
This command umount the Linux system build by Ubiquity, now fixed, patched and updated.
-----------------------------------------------------------------------------------------------------------------------------
Now you can shut down the CD Live system and restart.
When your brand new Linux FDE start it will show a screen mask of GRUB like that.

Type your password for the encrypted volume and wait until the GRUB menu list appear (see hd0,gpt1).

Wait until the countdown expires or type ENTER.
At this point, sometimes, the system remain frozen 1 or 2 minutes, wait until it go on.

Then the system will show the usual Mint logo and then the cryptsetup message.

When the login page appear insert you username and your password and ... enjoy.
INSTALLATION FOR PC WITH BIOS AND HDD WITH GPT - END
How to enhance the encryption strength of your Linux Mint FDE (for paranoids, like me)
You can see at the start of this tutorial that is Ubiquity who create the encrypted partition.
But you can enhance the strenght of you Linux Mint FDE creating the encrypted partition with the characteristics of your choice.
My first advice for a stronger encrypted installation is:
Boot your Live CD in the target PC and when ready ...

- Remeber that also this Appendix uses the same assumptions listed above
- Do not even start Ubiquity
- Skip Steps 1 and 2 of this tutorial
For HDD with GPT open a Terminal window and commit the following 10 commands:

sudo parted /dev/sda mklabel gpt
sudo parted /dev/sda unit MiB print
sudo parted --align optimal /dev/sda mkpart primary 1MiB 10282MiB
sudo parted /dev/sda unit MiB print
sudo cryptsetup -v --cipher aes-xts-plain64 --key-size 512 --hash sha512 --iter-time 5000 --use-random luksFormat /dev/sda1
sudo cryptsetup luksOpen /dev/sda1 sda1_crypt
sudo pvcreate /dev/mapper/sda1_crypt
sudo vgcreate mint /dev/mapper/sda1_crypt
sudo lvcreate -L 4G mint -n swap
sudo lvcreate -l +100%FREE mint -n root
Watch the second and the third commands !!!
The second command show you the disk size (10302 MiB).
Then with the third command we create a partition that end at: End disk space - 20 MiB !!!
i.e 10302MiB - 20MiB = 10282 MiB !!!
So we have spared 20 MiB for the Reserved BIOS boot area !!!
The fifth command listed above will ask you for entering 'YES' (in uppercase) to continue; then remember to turn off the uppercase when it ask you for entering the password twice !!!
You can rise the '--iter-time' value of this fifth command but remember that it will slow down your system during the boot up !!!
A value of --iter-time 100000 take approx. 5 minutes for boot up on a PC with CPU i5 !!!
Now start Ubiquity with the Terminal command:
sh -c 'ubiquity -b gtk_ui'&
Select your language and Click 'Continue'
If you are installing Linux Mint 18.X this new Ubiquity page will appear.
Here you can choose if installing third-paryt software or not.
Make your choice and go on.
Click 'Continue'
When you reach the 'Installation type' page select 'Something else', click 'Continue' and then proceed with steps 3 and 4 of this tutorial until the end.
My second advice is:
Change the sixth command listed in Step 4 of this tutorial:
'sudo dd bs=512 count=4 if=/dev/urandom of=/mnt/boot/crypto_keyfile.bin'
with this new one
sudo dd bs=512 count=4 if=/dev/random iflag=fullblock of=/mnt/boot/crypto_keyfile.bin
Warning: this command take a long long long time - approx. 30-40 minutes !!! on a PC with CPU i5, but only during the installation !!!
Anyway, also after these enhancements, you must not think that you are invulnerable.
You are vulnerable when you leave your system on and alone and when you are connected to a network or to internet.
And finally you must never forget that if your files are really interesting for the bad guys, the ugly truth is probably best depicted in this vignette:

I found this vignette on internet same years ago. Below you can see links to its repositories and its license.
http://www.explainxkcd.com/wiki/index.php/538:_Security
http://creativecommons.org/licenses/by-nc/2.5/
Emergency tools - How to access your encrypted partition with your Mint or Ubuntu Live CD
If your system does not start, because of PC hardware failure, boot-up files damage, ecc., but you are sure that your HDD (containing the encrypted partition) is OK you can access your data using the following procedure.
Start your PC with a Mint Live CD containing the same Linux Mint version installed in your HDD.

When your live system is up and running open a terminal window and commit the following 2 commands:

sudo cryptsetup luksOpen /dev/sda1 sda1_crypt
sudo mount /dev/mapper/mint-root /mnt
In this example we assume that your HDD reside on the installation PC and that you followed the installation procedure listed in this tutorial. Otherwise change the devices and LVM letter, number and names accordingly.
Remember that if you have chosen a 'btrfs' type filesystem for your '/dev/mapper/mint-root' device you must substitute the second command
sudo mount /dev/mapper/mint-root /mnt<
Comments
Hello jelabarre59 I have read your message.
About your questions my opinion is:
1) When you create the partition table on your HDD with Ubiquity it build a GPT scheme when started in UEFI mode. Otherwise it build a MBR scheme. You can also build your HDD scheme manually, using the Terminal commands 'sudo parted /dev/sda mklabel gpt' or 'sudo parted /dev/sda mklabel msdos'. As I already stated I suppose that if you are attempting this Full Disk Encryption solution you have a bit of skill using Linux and you are familiar with these commands. Anyway these commands are listed in Appendix A. Please consider that committing a wrong command like 'sudo parted /dev/sda mklabel XXX' will destroy the entire software structure of your target HDD !!!
2) If you want to re-use your previously build '/home' partition you must remount you encrypted physical partition (see for example Appendix B) and re-mount your LVM logical volumes. Then you can restart Ubiquity and proceed with a new installation, leaving your '/home' untouched. You must re-use your original password and crypto_keyfile.bin file.
Regards.
linux22
Did a bit of a modification of this, adding a separate /home partition.
The setup failed the first time through, probably because I was changing the volume group and logical volume names; I prefer using names unique to the machine I'm installing on, in case I have to recover the disk on a different machine. I most likely missed changing some value in the setup. So the second time I made a text file with the commands I had to paste into the terminal, and made sure I had edited them correctly. Worked good the second time.
One thing you are missing in the instructions using the ubiquity installer is creating a partition table on a new/wiped HDD. I don't know if the paritioning tool within the installer creates GPT or MBR partition tables, so I edited that separately then ran the install.
The one last thing I wonder is how one would go about doing a fresh re-install of the OS (if necessary) while preserving the contents of the /home partition. Would you copy off the crypto_keyfile.bin to a safe location and then copy it back in? Because if the /home partition cannot be preserved in reinstalls, there will need to be a different way to set systems up.
I like your crypto nerd joke...